A couple of weeks ago an old friend, Adam Dockley, got in touch to ask if he could feature this blog on his site. Adam is the estate agent who found my flat in London for me and helped me to sell it again years later. In many ways, he's the guy who made this whole Osaka project possible! If anyone is reading from the UK and needs an exceptional agent, I would recommend Adam without hesitation. Here's a link to the piece that they wrote about us.
https://dockleys.com/2019/07/25/self-build-in-japan-the-osaka-house-project/
Saturday, 27 July 2019
Monday, 22 July 2019
First steps inside
We
arrived and were led up the temporary steps to the house and then ushered
inside the blue sheeting that covers the frame. It then struck us that we were,
for the first time, standing inside our house! With the frame fully up and
standing on the wooden flooring beams, we could finally experience the scale of
the place we plan to be living for the next 20-25 years. We were finally able
to appreciate the layout, the flow from area to area and, perhaps most
importantly, the size of the rooms.
We
actually began our tour of the house standing on the outside wood deck. We have
talked in previous entries about how we like the Japanese idea of the inside
blending with the outside and it was immediately clear that they builders had
achieved this. There is a kind of roofing in Japan called noki (軒), often found on temples, where the roof extends over the
outside walkway and is supported by vertical beams. This allows for good
weather protection and the ability to transition from inside to outside without
having to put on shoes or use an umbrella. There’s a good page with more
information (Japanese) about noki
here.
Downstairs,
we were particularly pleased with the size of the study and the laundry room,
both of which seemed bigger than on the printed plans. The corridor that runs
from north to south is a little narrower than expected but as long as I can lay
off the Costco hot dogs a bit, I should still be able to squeeze down it.
Relatively speaking, corridors are kind of wasted space anyway, especially in a
small house, so it’s not something we are too bothered by.
Having
walked around the downstairs and chosen the height at which to put lights and
where to put the plug sockets and light switches, we were surprised to be told
that our next stop was the second floor. Obviously there is no staircase yet so
we had to make do with a long (and pretty wobbly) ladder. Being the brave one,
I went first to show Yuko how it’s done. Since I weigh about twice as much as
her, I can’t imagine the bending and contorting of the ladder as I tramped up
it made her especially comfortable but, by that point, I was too busy taking in
the second floor!
I
presume Yuko got up the ladder ok since she soon joined me upstairs. We both
looked around the main living space in silence. It was surreal – somehow, it
was both exactly as we expected and yet, at the same time, a complete surprise.
Standing in the middle of the living room and seeing where the balcony is
(covered by a sheet so we couldn’t see the view this time), the pantry, the
Japanese room, the height of the ceiling, the wooden beams etc. was such an
awesome experience. Even though it’s just a frame and a sheet (did I mention no
walls?!), for the first time we could imagine actually living in the house. Seriously cool stuff!
We
ran through a few more decisions about lighting and plug sockets and took a few
pictures and, before we knew it, we were in the car and on our way home (via
conveyor belt sushi and the golf range), no doubt smiling from ear to ear. It’s
been a tough journey to get to this stage but we’re finally getting to the point
where we can start to look forward to living in the house rather than just
building it!
That’s
it for this entry. More photos to follow next time I hope. In the meantime,
enjoy the very much blue-sheet influenced photos below.
![]() |
| The downstairs |
![]() |
| Upstairs. You can see the high sloping ceiling with exposed beams and the loft area above the tatami room |
![]() |
| View from the front door down the genkan |
![]() |
| Wooden floor beams. This is the master bedroom |
![]() |
| The wooden beams in the bedroom. Will be left exposed like this |
Wednesday, 10 July 2019
The Frame is Up!
Very exciting news over at the site. The rain has held off for the last couple of days and the frame is now up. The builder sent over the photos this evening and, honestly, we are pretty speechless. We're in love with our new house! I can't think of anything to write so here are the photos! So happy!
| The view from the roof deck |
| Inside the protective blue covers |
| The roof terrace access from the side |
| The frame! |
| The frame again! |
| The parking space. On the LHS, the steps are taking shape |
Thursday, 4 July 2019
A View From On High
When
is it going to stop raining?! It’s been a long, wet couple of weeks in Japan
with frequent weather warnings and some unfortunate folks in the southern
prefectures being evacuated. Osaka has not been as badly hit as some but the
bad weather has delayed the frame going up by about a week. We’re pretty used
to delays by now but it is still frustrating to pull back the curtains in the
morning and see that, once again, rain stops play.
There
has actually been some progress on site although the weather has meant that we
haven’t been over there for about 10 days. We’re both itching to go and take a
look for ourselves but, for now at least, we have to make do with some photos
from the builders. As you will see below, the scaffolding is now pretty much up
and we are ready to get started! The outline of the wood deck has also been put
in place.
We
have also had our first glimpse of the view we will have from the upstairs
floor balcony. I’ve scoured the pictures to try and get an idea of the height
from which the picture was taken and it looks to be at about the balcony level,
although I may be wrong. Nevertheless, it’s a pretty cool view, despite the bad
weather.
In
other news, we decided to forego the expensive (and to us, pretty meaningless) ceremony
to bless the land and the frame and all that stuff. I hope the Japanese gods
decide to take pity on us in light of our overall patience and unbridled
positivity towards the project. I’m sure there will be plenty of opportunities
for us to throw some rice and sake around at a later date. We will however be
meeting our carpenters in a couple of weeks which should be a nice experience. So
far, we’ve spent a lot of time with the architects and people coordinating the
design but not much with the people actually building the house. They probably
think we’re a bit crazy so it will be nice for them to see that for themselves.
Thanks
again to the new followers. We’ve actually just passed 10,000 views which is
pretty insane for a random couple building a house in a sleepy suburb in Japan.
More updates to follow in due course.
| The view to the west. Excuse the lousy weather! |
| Our house from the scaffolding. You can see the outline of the wood deck on the LHS |
| From the road |
| From the road 2 |
| Next door's garden is looking nice. Inspiring! |
Thursday, 27 June 2019
Raised Foundations
Hi all. A relatively
short update this week. There has been a reasonable amount of progress over at
the site but there’s not a huge amount I think we can really say about it in
the blog post! I was able to drive over there last Saturday to take some
pictures, which you can find at the bottom of the page as usual.
The most
noticeable change is that the next level of the foundations has been completed.
You can no longer see the steel rebar that is reinforcing the concrete and the
wood panels have now been removed. What is left is a smooth and rather cool
looking concrete maze on which the frame will eventually sit when it goes up
(hopefully in the next 2-3 weeks depending on the rain)
The concrete
base actually sits about 50cm above ground level. The reason for this is to
raise the whole house by that distance in order to build up as high as possible
without including an expensive (and difficult to get through planning control)
3rd floor. We want the house to be as tall as possible to protect
the views we have over the house in front, in case they decide to rebuild at
some stage.
I think, now
more than ever, we can really get a feel for how big the house is going to be
and where it sits on the plot. Actually, I think the builders have got the position
of the house absolutely perfect and there is plenty of access space around the East
side where all of the meters and various house equipment will be. The garden
feels like a good size and the wood deck is well situated. It’s still a bit
dicey next to the carpark area but that will no doubt feel a lot safer when the
roof is added.
There has also
been some progress on the concrete steps that will lead up to the front door
from the road. The plot shape and elevation dictate that these will have to be
fairly steep, but we’ve opted for a simple design that should hopefully make
getting up and down them reasonably easy.
As I said,
there’s not a whole lot to write about since the pictures can give you a much
better idea than I can. There are likely to be quite a few updates over the
next few weeks as the pace is really picking up. Of course, it’s now rainy
season so delays are always possible. As always, please keep in touch and keep
your questions and comments coming. Speak soon!
| View to the NW. Shows well how the house sits on the plot I think. |
| View to the SE taken from the garden. |
| View to the east. It's reasonably narrow between the end wall and the car park. The roof will make this a lot safer! |
| View down the soon-to-be staircase |
| View up the soon-to-be staircase |
| The gap where the front door will go. Before that is the porch |
| The corridor stretching from the study to the south wall of the house |
| Mini foundations for the wood deck |
| Smooth concrete - this is the kids' room |
| The south garden area. Small, but with elevated veg patches on the RHS |
| The main garden. There is a little bit of space to the left of where I am standing too |
| A final picture of our concrete maze |
Wednesday, 19 June 2019
Window Shopping
Greetings
all. For those in Japan, I hope the summer heat isn’t causing you too much
trouble. We’re up to the high twenties here in Osaka but the worst is certainly
yet to come. It’s been rather quiet on site lately as we are waiting on the
wood for the house frame to arrive and for a break from the recent rainy
weather to build the concrete base above the foundations on which our house
will sit.
The
groundwork and a few other things have delayed us a bit so we’re now looking
like November for our completion date. We were hoping to be in before the Rugby
World Cup, as the stadium is nearby and we have tickets but unfortunately, it
was not to be. Ah well, what’s another few weeks eh?
Whilst
the last couple of weeks have been pretty wet and miserable, we have at least
been able to make some decisions about materials and finishes for the outside
of the house. Obviously it’s not built yet (!) but I have a few sample pictures
which I’ll include below to give you all an idea of what it might look like.
The main focus today, however, is the windows...
I’ll
start by saying that choosing window frames involved a huge amount of
deliberating and compromise both amongst ourselves and also with the builders. We
are having LIXIL Thermos (in Japanesified English, Samos) windows fitted since they are double glazed and relatively
inexpensive. You can see more about them here. This gives a choice of both internal sash colours (to be discussed
in a later blog) and external sash colours. Double the fun!
Yuko
and I had been given a small sample to look at and had provisionally decided on
“Shine Grey”, a kind of dark and, oddly, not especially shiny grey as the exterior
frame/sash colour for all the windows. Since there are two LIXIL showrooms in
Osaka, it was pretty easy for us to drive over to one of them and have a look.
We were very positive and excited to go and have a look at our new windows.
Then
we encountered our first problem. I didn’t like Shine Grey. To me it looked
cheap and flimsy under the bright lights of the showroom. I didn’t like the
other options much either, with one exception. The black frames looked smart,
sturdy and, from a distance, they could have easily have been made of wrought
iron instead of the lightweight aluminium that they are really made from. They
seemed rather neutral and cool. I could imagine them aging well.
Yuko
didn’t like the black frames. Oh dear! Problem number 1. What to do? We asked
the shop assistant for help and she told us that some people like black frames
and some people don’t. Not especially helpful. She then showed us a mockup on a
computer screen with black frames and then grey frames, which didn’t really
look anything like our house. Again, not the breakthrough we were hoping for.
This was becoming an issue.
We
wandered round a few more times but it was pretty clear that we were at a bit
of an impasse. I kind of agreed that having all black frames for the whole
house would be a huge decision but I couldn’t really see any alternatives.
After rather a lot of pacing and not a whole lot of constructive commentary,
Yuko announced “We have a big problem”.
It was hard to disagree.
Now,
since I am a super husband and all-round reasonable man, I had reluctantly told
myself at this stage that I was likely going to have to accept the Shine Grey
all over the house. Of course I couldn’t tell Yuko that! That would be akin to
pulling out the white flag and I still wanted at least to discuss it a bit
more! Negotiations continued.
Then
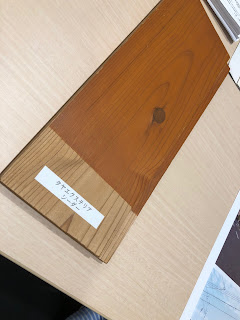
I had a bit of an idea. The lower part of the front of our house is going to be
clad with Japanese cedar in a kind of orange stain which should weather into a
kind of darker burnt orange hue. The top part is going to be finished in a
white-ish mortar with a small amount of yellow added. Whilst I had accepted
that the Shine Grey frames looked reasonable against white-ish backgrounds as
the two colours blend together reasonably well, what I really didn’t like was
the way the Shine Grey looked against the stained cedar. Black looked much
better I think. It could also pair up nicely with a black door handle on the
wood front door and the darkness of the roofs above. I felt that this would
create a kind of cool wooden ‘wrap’ effect around part of the ground floor of
the house. Perhaps you can see where this is going...
We
asked the lady at LIXIL if people often have different window frames for
different parts of the house and she said that they didn’t really. This didn’t
bother me (us?) as we aren’t trying to build a 100% typical Japanese house like
the ones you get from the big homemakers. In a way, we are trying to build
something that incorporates both of our cultures (although that’s certainly
more difficult to do with the outside than the inside). A plan was developing.
At
home the discussions continued with lots of Google image searching for examples
and inspiration. At one stage, I think I had about 70 tabs open on my computer.
Conversation ebbed and flowed but I sensed that we were starting to come
together towards consensus. Perhaps I could put the white flag away for good?
After
more than a day of discussion, we finally opted for the bolder option of having
black window frames on the cedar part and Shine Grey for the mortared walls. We
sent our decision off to the builders with a couple of the pictures we had sourced
to explain the concept. They responded to say thank you and that we would speak
about it at the next meeting.
At
the meeting, we went over the various choices we had made and the conversation
turned to the windows. Japan is pretty conservative when it comes to these
things and conformity is certainly the norm. Doing something that others don’t
is perhaps seen as a bit eccentric and a bit individualist. As such, our
architect described our two (small) black window frames as rather “kitsui”, loosely translated as intense, bold, or striking. Negotiations had re-opened and this time with a different
adversary. This being Japan, several long and uncomfortable silences ensued!
Yuko
did a grand job of mediating between us and eventually it was agreed that we
would in fact go with the more striking
option. I (and perhaps still to a lesser extent), Yuko have faith that the
black windows are going to look good and, at the very least, in a world of
conformity, it will make our house a bit unique.
All
this fuss over two small windows! We’ve lived at our current flat for over 3
years and I still couldn’t tell you what colour the frames are on the outside. Still,
I’m really glad that we took the time to really discuss it together, as
difficult as that was at times, and presented our decision to the builders as a
team. If it looks awful, I’ll have to suck up my pride and find some
replacement frames or get the paintbrush out.
I
think that’s a good point at which to draw this entry to a close. In other
news, there’s going to be some concrete work on site in the next few days so
hopefully I can get some pics up early next week. I’ll also try and get something
together on some of the interior decisions we’ve made lately. Tiles, toilets
and the like. As always, we really appreciate the ongoing feedback, commentary,
shares and likes. We’re closing in on 10,000 views which is just absolutely
insane. Thank you all for taking such a keen interest.
![]() |
| The sash colour options. Interior are on LHS, exterior on RHS. |
![]() |
| Cedar wood cladding which will feature the two black windows. |
![]() |
| Mortar options - we will probably go for something like the one right in the middle. |
| An "inspirational" picture which shows the look we are going for. |
![]() |
| The only picture I remembered to take in the showroom despite spending hours there! |
Tuesday, 28 May 2019
Bathroom Madness!
It’s
almost the end of May and the last few days in Japan have been seriously hot
and the thought of working out on a building site all day seems almost
unfathomable. Perhaps that’s why, when I went over to the house yesterday (I’m
not sure if I should start calling it a house yet but it now has foundations so perhaps it is time), there
were precious few changes to be seen. It seemed as if we had made no progress
this week, save for some delivered metal poles in the car park area and the
absence of the digger at the top that been there the previous week.
Based
on other blogs that we have read about house building in Japan, such as the
excellent Catforehead Blog and Gaijin House Blog, it is not altogether unusual
to have brief pauses in the frantic building schedule, due either to paperwork,
staff scheduling or other factor. We are not all that concerned as it’s only a
week but it was a little disappointing to see no obvious major signs of
progress.
This update therefore is not going to be about the site itself but our first forays into choosing utilities for the inside of the house. We
are going with the builder to the bathroom showroom this weekend to pick out
the options for our small bathroom. As such, Yuko and I have spent a number of hours this
week looking through the online catalogue for the TOTO 1616 bathroom that we
are having installed. TOTO is the brand and 1616 refers to the size of the space, as decided
by our builders in the original plans (we took their suggestion as to what
would fit best given the available area and other rooms in the house).
This
sounds simple but is, in fact, anything but simple. TOTO offers about 7 different
ranges of bathrooms, each then further subdivided into about 8 trim levels with
certain things being included or excluded for each. Somewhere between 50 and 60 different starting points. Customers then can choose
from a dizzying array of add-ons and upgrades for everything from rainfall
showers and TVs to screw covers and window blind density. Sounds great right?
Full customization!
In
practice, this is absolutely baffling. The catalogue for each range is over 400
pages long and everything is explained meticulously. By the time you have
reached the end of choosing everything, you wonder if you should have just
started from the next trim level up. By the time you’ve done through that, you
think “Well maybe we should look at another range”. We’re drowning in choice!
How are there so many types of white? Why is a square tap more expensive than a
round one? Help!
I’ll
report back from the TOTO showroom later in the week. In the meantime, here are
some typical pages so you can see what I’m talking about. Madness.
| Page 135 of about 100000000 |
| Why are there so many choices? |
| Not in fact a physics textbook but a bathroom catalogue |
Subscribe to:
Posts (Atom)
竣工 - The End :-)
Greetings from our new home! It seems crazy to be saying that but we have finally moved out of our small apartment and are now officially (p...
-
Greetings from our new home! It seems crazy to be saying that but we have finally moved out of our small apartment and are now officially (p...
-
Winter greetings everyone - just a week to go until Christmas! Things are certainly winding down here in Japan so this will be one of the fi...
-
Hi all. A relatively short update this week. There has been a reasonable amount of progress over at the site but there’s n...


