Showing posts with label walkthrough. Show all posts

Monday, 22 July 2019

First steps inside

On Friday last week, we had a meeting at the house (definitely going to call it a house now, even though it doesn’t have any walls yet) to confirm the location of plug sockets and light switches. This sounded pretty boring to be honest but then we hadn’t actually really thought about what it would entail.

We arrived and were led up the temporary steps to the house and then ushered inside the blue sheeting that covers the frame. It then struck us that we were, for the first time, standing inside our house! With the frame fully up and standing on the wooden flooring beams, we could finally experience the scale of the place we plan to be living for the next 20-25 years. We were finally able to appreciate the layout, the flow from area to area and, perhaps most importantly, the size of the rooms.

We actually began our tour of the house standing on the outside wood deck. We have talked in previous entries about how we like the Japanese idea of the inside blending with the outside and it was immediately clear that they builders had achieved this. There is a kind of roofing in Japan called noki (), often found on temples, where the roof extends over the outside walkway and is supported by vertical beams. This allows for good weather protection and the ability to transition from inside to outside without having to put on shoes or use an umbrella. There’s a good page with more information (Japanese) about noki here.

Downstairs, we were particularly pleased with the size of the study and the laundry room, both of which seemed bigger than on the printed plans. The corridor that runs from north to south is a little narrower than expected but as long as I can lay off the Costco hot dogs a bit, I should still be able to squeeze down it. Relatively speaking, corridors are kind of wasted space anyway, especially in a small house, so it’s not something we are too bothered by.

Having walked around the downstairs and chosen the height at which to put lights and where to put the plug sockets and light switches, we were surprised to be told that our next stop was the second floor. Obviously there is no staircase yet so we had to make do with a long (and pretty wobbly) ladder. Being the brave one, I went first to show Yuko how it’s done. Since I weigh about twice as much as her, I can’t imagine the bending and contorting of the ladder as I tramped up it made her especially comfortable but, by that point, I was too busy taking in the second floor!

I presume Yuko got up the ladder ok since she soon joined me upstairs. We both looked around the main living space in silence. It was surreal – somehow, it was both exactly as we expected and yet, at the same time, a complete surprise. Standing in the middle of the living room and seeing where the balcony is (covered by a sheet so we couldn’t see the view this time), the pantry, the Japanese room, the height of the ceiling, the wooden beams etc. was such an awesome experience. Even though it’s just a frame and a sheet (did I mention no walls?!), for the first time we could imagine actually living in the house. Seriously cool stuff!

We ran through a few more decisions about lighting and plug sockets and took a few pictures and, before we knew it, we were in the car and on our way home (via conveyor belt sushi and the golf range), no doubt smiling from ear to ear. It’s been a tough journey to get to this stage but we’re finally getting to the point where we can start to look forward to living in the house rather than just building it!

That’s it for this entry. More photos to follow next time I hope. In the meantime, enjoy the very much blue-sheet influenced photos below.

inside house japan frame
The downstairs
house japan frame loft wood beams exposed
Upstairs. You can see the high sloping ceiling with exposed beams and the loft area above the tatami room

genkan house japan frame
View from the front door down the genkan
bedroom house japan frame
Wooden floor beams. This is the master bedroom
wooden beams roof japan house
The wooden beams in the bedroom. Will be left exposed like this

Friday, 18 January 2019

House Walkthrough 9 - Deck, Balcony and Roof Terrace

This is the final chapter in the walkthrough of the house. There are a few other small things that will no doubt appear in future posts but I think we’ve covered the main elements throughout this series. I hope it has been interesting to read about!

For this entry, I’m collating together what I might call the “connected” outside spaces. What I mean by that is the balcony, wood deck and roof terrace. Although we will have a garden at some stage, we currently have no idea what it is going to look like or whether there will be enough funds left in the budget to complete it soon after finishing the house itself. It’s likely something that we will have to come back to months (years?) after finishing the building. I’ll be sure to write a blog about it at some point!

As for the wood deck, it is a kind of L-shape surrounding the master bedroom and the study, wrapping around the North West corner of the house. It will be about 1.5 meters deep which should allow for a couple of outside chairs and a small table. In one of the meetings we talked about putting some hooks up for a hammock underneath the sloped roof. I’m not sure if that is still on the cards, though to be honest, if I can’t start shifting some of this Christmas excess, I’d end up pulling the whole house down if I tried to get into a hammock.
japanese house plans deck
The wood deck
I’m not sure yet exactly what function this deck is going to perform but we both really liked it in the model house that we saw. Being able to transition between rooms via a covered outside walkway is kind of cool and it’s nice to be able to sit outside looking at the garden with a cup of coffee. We also like the idea of a gentle transition between the indoors and outdoors which is found in some traditional Japanese homes. I remember walking on such a deck in one of the old houses in Kyoto and enjoying the feeling of wood on shoeless feet whilst looking at the garden. Hopefully we can recreate something similar.

Upstairs, there is a large balcony (4mx2.3m) connected to the living room by a really cool custom-made sliding door. Again, we saw this in the model house and it really adds to the light and space, making the living room itself feel much bigger. Since the doors open to be completely hidden in the wall, again there is this neat connection between inside and outside.

japanese house plans balcony
The balcony
The most important thing for this balcony is that it can be used for something practical. Most Japanese balconies are small and used only for drying washing. However, at around 10m2 ours is big enough for a table and chairs so we will probably endeavor to have dinner out here when the weather is nice (and the mosquitos are on holiday). Its proximity to the kitchen should make this very practical. To the North West we will have mountain views over the road and we may even be able to see Osaka over the house to the West.

May be able to see Osaka? What do you mean may? Surely you know for certain and have planned this intricately?! Actually, no. The reason we haven’t put huge amounts of thoughts into the geometry of the views from this balcony (other than situating it in the best possible position for the view to the North West) is that our house has a really interesting and rather unique feature - a roof terrace!

The roof terrace sits about 7 meters above the foundations and is accessed via a continuation of the stairwell from the living room, almost like an additional floor. Like the balcony, it measures about 10m2 and will give 180 degree views of the surrounding landscape. This was really important to us as one of the most impressive things about where we have decided to live is its location, on the side of a mountain. From the roof terrace, we will be able to look out over the house in front to see the vast expanse of Osaka city to the West and the mountains to the north. On a clear day, it is possible to Kobe 50km to the west.
japanese house plans roof terrace
The roof terrace from above

japanese house plans roof terrace
Where the roof terrace sits

The intention is to have some comfortable seating and a small table or two up there so that we can enjoy watching the sunsets with a drink and some snacks. Since the weather in Japan almost always comes from West to East, another advantage is that we should be able to get a live weather forecast at any time just by heading up there and looking into the distance!

Most importantly, the roof terrace gives us security for the future. As I mentioned, one of the best things about where we have chosen to live is the view and this roof terrace protects that. The house to the west is old (and seemingly unoccupied) so we have no idea how long we have until someone decides to knock it down and build something new. Though there are protections about sunlight and proximity, there are no protections for a view so it’s possible that a new full-height building could block some of our view on the upstairs floor. It is true that the foundations of that house are a few meters lower than ours so they cannot build a house as tall as ours but having a roof terrace mitigated a good deal more of that risk and so we decided to go ahead with it. We cannot wait to stand up there for the first time and take in the view!

That about wraps up this series. From now on, we’ll mostly be featuring photos and updates on the development (which as I mentioned last time has now started) as well as any other interesting stuff that comes up. For those that have been following so far, thank you so much for doing so. We’re looking forward to sharing the next stage with you and showing you some real-life progress. Stay tuned!

japanese house plans
Our lovely house!


Sunday, 13 January 2019

House Walkthrough 8 - The Japanese Room


In the North East corner of the upstairs space we will have a 和室 (washitsu) or Japanese room, the floor of which will be made of traditional Japanese reed mats called 畳 (tatami). These rooms are typically used for celebratory meals or as an additional sleeping space for guests. Houses that have a family shrine often place it in this room, although I don’t think we will be getting one ourselves.

japanese house plans tatami
Location of the room in the top north east corner of the house
We want to keep this room as simple as possible so have opted not to include much in the way of shelving, save for a low lying runner unit on the north wall. Along the east wall will be some low (frosted?) windows bringing in some natural light.

japanese house plans washitsu
Low windows at the bottom of the east wall
We have had to make two relatively big decisions with this room and both were quite difficult. Firstly, we were asked whether we wanted the floor to be flush with the living room without a step up onto the tatami. This was our first preference. However, what we discovered was that by raising the floor of the Japanese room, we could install long drawers which slide out, into which we could put all the futons and bedding for when the room is used for sleeping. We decided that not having to include large cupboards for this stuff would give us a larger and simpler space and so we decided that the trade-off was definitely worth it.

The second decision was whether or not to leave the space open or to put in some sliding doors to separate the space from the living room. This time, it was a financial consideration as these doors were not exactly going to be cheap. That said, if we were to decide to have doors, there were various options to choose from, falling into two main categories.

The first are called shoji which you may have seen in pictures or films. They are basically a light wood frame and the “door panel” is made of waxy paper. They are beautiful but bad at keeping out unwanted light, poor at keeping heat in and prone to getting broken by kids and drunk adults. They are also quite expensive. The second are called fusuma and are heavier and more hard-wearing and better at keeping light out as they are more opaque. They are also a little cheaper but, I think, less beautiful than shoji. (More info about them both here https://simplicable.com/new/fusuma-vs-shoji)

japanese house plans washitsu
Doors separating the space from the living room
Again, we flip-flopped between the two different kinds of doors and also having no separation at all. Eventually we concluded that being able to close off the space was valuable but not to the extent that we would splash out of the shoji. We have therefore compromised and chosen fusuma. If the budget starts to get away from us, we can always change our minds again.

That’s it for this entry. The final entry of the walkthrough will be the balcony and roof terrace. Stay tuned!   

Thursday, 20 December 2018

House Walkthrough 7 - The Kitchen and Living Room

Back in the spring of this year, we went to see a house that our builders had recently completed and were pleased to find that the owners had reversed the usual layout, putting the main living area upstairs and the bedrooms on the ground floor. Although this is quite rare in Japan, it was something that we had been considering. People had told us that doing so is very expensive but we were relieved to hear that this was not in fact the case, especially if the bathroom (which can require structural reinforcement underneath) remains on the ground floor.

The additional light and feeling of spaciousness from having the house configured this way was enough to convince us to go ahead with this plan ourselves. As such, we are having an open-plan living room and kitchen on the upper floor. It will feature a sofa and TV area, an island kitchen with connected dining table, a corner “bar and wine-cellar” space and, finally an enclosed pantry room next to the kitchen. There will also be a toilet near the top of the staircase.

japanese house plans living
The upstairs living and dining area. North is to the top of the paper.
I’ll start with the sofa and TV area. This sits at the north end of the space, adjacent to the Japanese room (the next blog entry) and the balcony (the blog entry after that). In the corner will be a (British!) wood burning stove capable of heating the whole of the upstairs area and, due to some very clever air recycling, some of the downstairs too, all being well. Wood stoves are not usually the most cost effective way of heating houses but, in this case, we have been rather lucky (or clever, depending on how you see it).

By going with a building company based a minute down the road from us, we have access to free wood for burning whenever we require it, as long as we are prepared to cut it and transport it ourselves. This is a mutually beneficial perk in that they can keep us happy and supplied with winter fuel and we can help to relieve them of the offcuts from their building projects that they would otherwise have disposed of. Symbiosis in all its finery. The one problem is that our tentative move-in date is in the middle of the hot summer next year so it’s unlikely we’ll get a chance to test out the new stove for a few months!

The TV will be placed against the North wall with a long horizontal window above it. We will be bringing our cheapo TV board from the current apartment as we’ve grown rather fond of it and it’s pretty inoffensive to look at. We’ll probably have an L-shaped sofa and coffee table with perhaps an additional armchair added at some stage. It’s odd that, despite thinking about the house almost constantly, it’s still really hard for me to visualize the size of this space. Time to get the tape measure out again.

To the south, we have a large island counter unit with raised breakfast bar which should accommodate a couple of stools. We have been back and forth so many times about what to put on the island. Essentially there are three choices. 1) a sink 2) the hob 3) nothing. The downside of the sink is that it means you have to look at either dirty items waiting to be washed up or clean items that are drying. The hob looks nice and you can talk to people while you are cooking but it makes extractor fans more difficult (or much more expensive in the case of downdraft extractors). Cooking oil has a habit of getting everywhere too.

We have therefore opted for nothing on the island. This is a little boring but should enable us to make great pizzas and dump all the shopping down when we get home. If we really want to cook on the island we can use a cheap portable gas stove, which we already own. Also on the island will be a western-sized oven (which is being delivered today!) and a few cabinets. Connected to it will be a dining table (likely our current, horribly stained, bottom-of-the-IKEA-range version for the time-being) and 4 chairs.

On the south wall will be a long counter with sink and hob and various cabinets and a drying rack. I believe this is called a Swedish something-or-other. Although we will not install a dishwasher immediately (the quote from the fitter the builder uses was really high), they will prepare the cabling and piping for us to add one at a later stage. I anticipate we’d be able to save a few hundred dollars doing it this way but we’re not entirely sure if we will get one at all. The countertop (both the wall unit and the island) are going to be granite. We have found a supplier that is not too expensive and we both think it will make the kitchen really special. It’s such an important part of he house to us that we’ve decided this is an area to spend a bit more on.

Adjacent to our fridge in the south-west corner will be the bar and the wine fridge. When the plans were almost finalized and our existing appliances accounted for, I was left with just over 2 meters of space in which to accommodate both items. Since the wine fridge we have chosen is about 60cm wide, this left about 150cm for the bar – not too shabby! This is the only part of the house I can truly say I have designed myself. I took a pencil and some paper and drew up a scale-ish drawing of the bar and gave it to the architect. He seemed quite impressed!

home bar plans
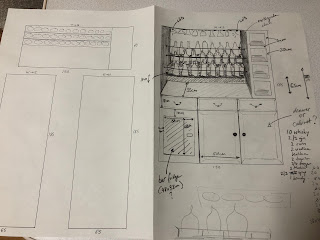
The bar. Original plan was three 'steps' but final design will likely have 3 rows of bottles above each other.
The bar will have 3 rows of bottles, each one a bottle deep and holding 12-15 depending on dimension. The top row is intended to be Japanese whisky, the middle Scotch and the bottom for others. There will be brass runners running horizontally to stop bottles falling during earthquakes and angled earthquake-proof rails above for us to hang glasses. On the right-hand side will be doored cabinet with more space for glassware and accessories. The counter-top below the bottles will provide space for preparing drinks and underneath will be drawers for (more) bottles, cutlery and a fridge. It’s one of the parts of the house I am most excited about since I’ve never really designed anything before and it will be really cool to see the idea actually comes to life.

To the East of the kitchen is a pantry room for storing our dry foods and a few appliances. We were both quite keen on having a lot of storage space for food as we do a lot of our shopping at Costco. For those of you unfamiliar with Costco, it’s an American wholesaler which sells really good products (but in bulk) and is a great source of ingredients and items that can otherwise be really expensive here in Japan. The pantry will have a window for overall ventilation and simple shelves on both sides.

Just outside the pantry is a shokkidana which is a kind of Japanese welsh dresser and is used for holding all sorts of plates and mugs and other items. My wife has designed it (after some not inconsiderable consultation with her mother) to feature plenty of storage, a space for the rice cooker and a place to display our copper pans. We looked at a few store-bought options but the quotation from our builders to make one for us was pretty reasonable and so we went with Yuko’s design. A happy wife is a happy life right?

I should probably end the tour of the living room and kitchen there. I expected to take about 20 minutes writing this entry but it’s ended up taking about 5 times that. Oh well - I suppose it’s the biggest and most important area in the house so perhaps it does warrant a bit of verbosity. I’ll try to get the final two entries on our walkthrough up this week as...did I mention that...we have started building!!!

竣工 - The End :-)

Greetings from our new home! It seems crazy to be saying that but we have finally moved out of our small apartment and are now officially (p...