Showing posts with label tatami. Show all posts

Tuesday, 11 February 2020

A different kind of delay

I'm writing this from Incheon Airport in Korea as I am heading back to the UK for a week. Bad news - a delay! Thankfully, this time, it's not the house that is delayed but me! The incoming aircraft is arriving late so I have an extra 6 hours to kill at the airport and hopefully 600 euros of compensation heading my way. Thanks to the European Union for that one.

This gives me more than enough time to put up some photos from when Yuko went over to the house last week. Apparently it was absolutely teeming with contractors, so much so that it was quite hard to take decent photographs, though I think she's done a pretty good job!

Yuko informs me that there were a number of people there doing the "Feather Feel" finishing to the walls. This is a finishing technique originating from a German company that is supposed to make the walls look especially beautiful and is pretty common in Japan these days. Basically, the wallpaper is primed using Paper Fleece (like this) and then a final coat is added (such as with this marble-based paint). More information available in Japanese here for those of you in Japan.

We have also had a few final decisions to make as yet more items we had chosen have gone out of stock or been replaced by newer versions. Mostly this has been easy but choosing two new toilet sinks at short notice with pretty strict dimensions was rather tricky. We are also still debating whether or not to put a handrail around the top of the car parking area for safety. That's something we don't immediately have to decide and may depend on how sturdy the roof is over the car park but I'm minded to just put a rail there anyway to be doubly sure.

There's not much else I can add other than to put up the photos below. It sucks being away from the house at a crucial time but being busy (Conference in Cambodia was excellent by the way) certainly helps to take my mind off the slowly ticking clock. Less than 2 weeks to go!


garden stone stairs slope
The stone stairs and rocks have started to go into the slope garden. Looks awesome!
parking area roof
Roof going over the parking area

feather feel stairs handrail
Feather feel finishing of the walls. The new handrail is beautiful and likely to make getting our fridge upstairs VERY tight

bar construction
The base of the bar. Now under construction. The LHS big gap will house a mini fridge. I designed this!

shokkidana
The shokkidana for our kitchen stuff. Yuko designed this!

loft ladder
Loft ladder waiting to go into the attic above the Japanese room

tatami room wallpaper
Moss green wallpaper in the tatami room. I'm pretty sure the screen doesn't do the color justice. Yuko says it is very nice

tatami room wallpaper
The tatami room from the other angle

Small problem. One was brushed and the other shiny so mix and match didn't really work. I went with the long handle type for all fixtures on the bar as a result. It's the same as the handles on the kitchen cabinets


Tuesday, 21 January 2020

Tiles and Tatami

Greetings from (a rather cold) Osaka. The end of the semester at university is almost upon us and things are beginning to wind down. In just two weeks, I will be heading off to Cambodia to present at a conference and then onto the UK for a week. When I come back, we should be moving in!

Yuko and I had a meeting with the builders on Saturday morning, a week after the previous visit to site. When we arrived, we were pleased to see a number of vehicles parked out front. Vehicles equals builders and builders equals progress!

The first task was to work out where to put our name plate, the intercom and the light so that they can be seen in the dark. Thinking about it, it is rather peculiar that Japanese people put their names on the outside of their houses but that is the done thing here so there we go. Our building manager had helpfully set up a template on the concrete wall with various pieces of paper. 

Although the positioning was good, the name plate wasn't the same size as the one we have picked out. This was quickly solved with a bit of re-folding but then we hit on another, admittedly minor, problem. The planned intercom and light were silver but we wanted to get a black name plate since we think this will look better against the grey concrete and we thought that the other parts should match. The neighbours have a similar setup and it looks great. Changing the light frame colour is easy but a black intercom may necessitate a slightly different model. They are going to look into this for us.

We also had to choose where to put the tiles from the top of the outside staircase through the porch and into the genkan. We opted for a slightly wider area of tiles outside to try and tie the inside and the outside together a little more. We also elected to surround the East side of the house (i.e. the side not being landscaped) with dark grey shingle. This should be easy to maintain, avoids mud getting traipsed around in the event of rain and finally, as a very astute colleague pointed out to me, provides a satisfying crunching sound underfoot, warning of any potential intruders!

Another big decision, which I stupidly forgot to take a photo of, was how to finish the staircase outside. Our quote included a finishing and brushing of the concrete but we felt that this was still a bit stark, especially when combined with the large concrete parking area. Another option was to finish with embedded small stones which would provide a nice colour and textural contrast, softening the staircase and differentiating it from the parking area. It was not a particularly expensive option so we opted to do it.

The car parking area on the other hand is going to be plain concrete. We had talked briefly about adding some lines or pattern into this but the quote for this was a lot more expensive than we had expected or budgeted for. We quickly declined in favour of the simplest, cheapest option. No big deal.

Inside, our main task was choosing the grouting for the various tiles that we had chosen. In all, there are 6 tiled areas. The genkan, the laundry room, the bathroom (except the wet room), both toilets and the kitchen wall. For the terracotta-ish coloured tiles we went with as close a match as possible for the grout, whereas for the darker tiles we went with a light grout and the white kitchen tiles are having a light grey grout.

I also asked the builders whether we would be able to choose the colour of the heri, the fabric borders of the straw tatami mats which comprise the floor in the Japanese room. Most people don't care too much about this but they confirmed that we could choose if we wanted to.

Having gone through the process of choosing colours yesterday, I can now understand why people don't bother. Choosing is very, very difficult! I ended up devising a strategy where Yuko and I would each choose our top three (of the 24 colours) and send them to each other as soon as our phone clocks hit, say, 11:47. Here are the results:

First Round

Tom: 2 / 11 / 12
Yuko: 7 / 15 / 22

No match. We then decided to remove these from the pool and choose again. Second time

Second Round

Tom: 1 / 4 / 17
Yuko: 13 / 16 / 21

Oh dear. This is not going well. Remove and try again with 2 more.

Third Round

Tom: 3 / 5 
Yuko: 6 / 14 

Right. Why did I decide to do this again? And why did I create this stupid choosing system? What do we do now? Choose the bright red one that neither of us like? What do you do when your tastes are fundamentally different? 

Being the superb husband that I am, there was only one thing for it. I revisited Yuko's first choices and reassigned number 7 as my personal favourite colour in the whole world. We are having number 7. 

(Jokes aside, I actually really like number 7 and it didn't help that I was looking at the colours on my smartphone and the colours on a desktop are completely different!)  

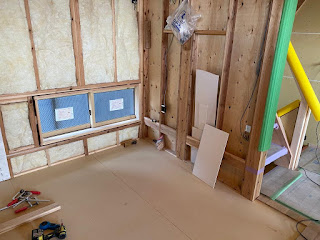
In terms of progress, there were more changes to be seen throughout the house. Downstairs, construction of the sink unit in the bathroom had begun, the sink itself sitting in the adjacent room waiting to be installed. The sliding door housing for the genkan has been partially completed and the toilet room is almost finished. We were also shown the addition of a removable wall in the study so that the air conditioner piping can be accessed and maintained. Very James Bond.

Upstairs, it was heartening to see that the Japanese room has finally been cleared ready for construction of the raised floor and finishing of the walls (the only place in the house where they have not yet been boarded over). Kitchen tiling has begun and fills a much larger portion of the wall than I had expected. Handrails have been started on the staircase and the area just before the roof balcony has been fully boarded over and now feels a lot more enclosed. Outside, the metal frame for the roof balcony is in place. It looks huge!

That's about it for this time. Photos below as per usual. We will head over to the house again on Sunday morning in the expectation of some major changes. Looking at the schedule, there is exciting stuff happening pretty much every day from now on. Landscaping starts in less than two weeks and in less than five weeks, we will be in! Speak soon!

tiles grout
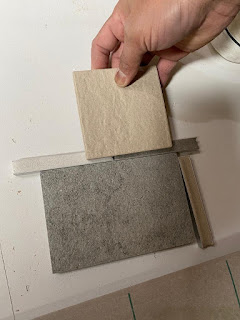
Choosing grout. Terracotta coloured will have matching grout. Grey will have light grout.
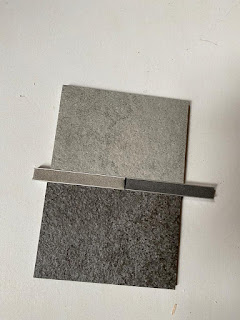
tiles grout
Choosing grout

tiles grout
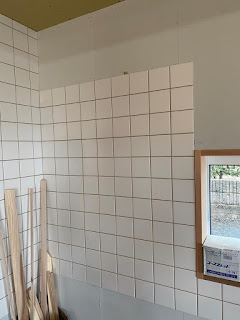
Kitchen tiles. Grout will be light grey

tatami heri color
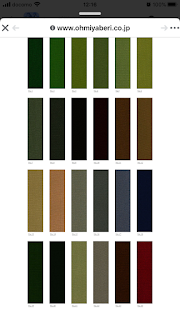
Choosing tatami borders. We opted for Number 7 (far left of second row)
sliding door
Sliding door frame for the genkan

sliding door
Sliding door frame for the genkan 2

air con ducting
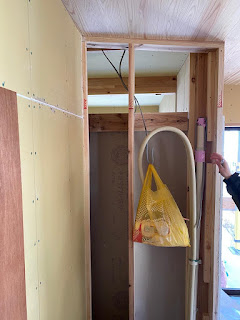
Secret wall, currently housing a pipe and a carrier bag full of snacks, which will hopefully be removed

sliding door
Sliding door housing for study

bathroom
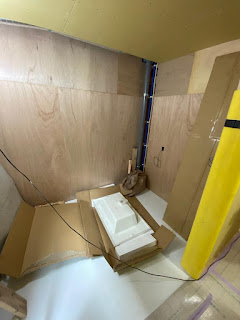
Bathroom disrobing area with the beginning of a sink unit

bathroom laundry sink
An upside-down sink bowl in the laundry room

corridor
Corridor on the ground floor

staircase handrail wood
Staircase to top floor with beginning of a handrail

staircase handrail wood
Handrail

toilet upstairs
Upstairs toilet. Almost finished, ready for cabinet and sink on LHS (and the toilet obviously)

raised washitsu
Japanese room, now cleared. Will be raised. On LHS (just out of frame), we will have 44cm of wood floor for cabinets, vases or whatever we decide to put there (known as tokonoma)

roof balcony metal
Slightly wonky photo of the metal supports for the roof balcony. Was a very clear day!


Sunday, 13 January 2019

House Walkthrough 8 - The Japanese Room


In the North East corner of the upstairs space we will have a 和室 (washitsu) or Japanese room, the floor of which will be made of traditional Japanese reed mats called 畳 (tatami). These rooms are typically used for celebratory meals or as an additional sleeping space for guests. Houses that have a family shrine often place it in this room, although I don’t think we will be getting one ourselves.

japanese house plans tatami
Location of the room in the top north east corner of the house
We want to keep this room as simple as possible so have opted not to include much in the way of shelving, save for a low lying runner unit on the north wall. Along the east wall will be some low (frosted?) windows bringing in some natural light.

japanese house plans washitsu
Low windows at the bottom of the east wall
We have had to make two relatively big decisions with this room and both were quite difficult. Firstly, we were asked whether we wanted the floor to be flush with the living room without a step up onto the tatami. This was our first preference. However, what we discovered was that by raising the floor of the Japanese room, we could install long drawers which slide out, into which we could put all the futons and bedding for when the room is used for sleeping. We decided that not having to include large cupboards for this stuff would give us a larger and simpler space and so we decided that the trade-off was definitely worth it.

The second decision was whether or not to leave the space open or to put in some sliding doors to separate the space from the living room. This time, it was a financial consideration as these doors were not exactly going to be cheap. That said, if we were to decide to have doors, there were various options to choose from, falling into two main categories.

The first are called shoji which you may have seen in pictures or films. They are basically a light wood frame and the “door panel” is made of waxy paper. They are beautiful but bad at keeping out unwanted light, poor at keeping heat in and prone to getting broken by kids and drunk adults. They are also quite expensive. The second are called fusuma and are heavier and more hard-wearing and better at keeping light out as they are more opaque. They are also a little cheaper but, I think, less beautiful than shoji. (More info about them both here https://simplicable.com/new/fusuma-vs-shoji)

japanese house plans washitsu
Doors separating the space from the living room
Again, we flip-flopped between the two different kinds of doors and also having no separation at all. Eventually we concluded that being able to close off the space was valuable but not to the extent that we would splash out of the shoji. We have therefore compromised and chosen fusuma. If the budget starts to get away from us, we can always change our minds again.

That’s it for this entry. The final entry of the walkthrough will be the balcony and roof terrace. Stay tuned!   

Friday, 10 August 2018

Plans! - A Starting Point


A few weeks passed from our laundry list meeting and we were both getting quite nervous and excited to see the first actual plans for our house. The day finally came around and we headed off to the house builder to see what they had come up with.

Overall, we were reasonably positive but we quickly discovered several things that would need changing. I don’t want this to be a long post as the plans themselves are to be found underneath so I’ll make a list.

1. The overall house was too small
2. There wasn’t really a laundry room on the ground floor, rather a sink space
3. The kids bedrooms needed to be bigger and the access looked problematic and potentially a bit of a waste of space.
4. There is no need for the kids bedrooms to have access to the wood deck. Better to turn that outside space into inside space.
5. Study too long and narrow to have reasonable desk space and bookshelves
6. Upstairs was rather cramped and no pantry area.
7. We had miscommunicated the tatami room and were in fact looking for something around five or six mats in size, enough to have dinner in. This was only 3 mats.
8. The roof terrace access would have been quite tricky (although they stressed this was a work in progress)

In summary, we evidently needed to increase our budget by quite a lot. We had expected this and were prepared to do so but it did bring us back down to earth a bit. We discussed all the likely amendments and it seemed that, by the end of the meeting, both sides had a much clearer picture of what was needed.

I think we had been a bit naïve up until this point to assume that the process would all be unicorns and rainbows since everything was going so smoothly. It was probably a good thing to be stopped in our tracks and to have to think quite fundamentally about the design and the scale of the project.

We concluded that the meeting had been a bit tricky, not perhaps what we had expected but ultimately a positive and fruitful one and, in the following days, the more we talked about it, the more we saw it for what it was. A starting point.

Anyway, here are the plans...

Downstairs on the left, upstairs on the right


A rough translation of the plan above
Side profile looking from North to South


4 profiles of the house


竣工 - The End :-)

Greetings from our new home! It seems crazy to be saying that but we have finally moved out of our small apartment and are now officially (p...