Showing posts with label master bedroom. Show all posts

Monday, 3 February 2020

Pictures, Pictures, Pictures!

3 weeks and counting! This week, rather surprisingly, has absolutely flown by and we are now only 2 visits to site away from moving in. I say we when actually I mean Yuko. Sunday marked my last visit to site before we have the keys in hand as I will be off to Cambodia on Thursday to present at a conference before heading to the UK for a week to see family. Not the greatest timing but that's where weeks of delays will get you! 

All this means that Yuko will have to head over without me and take some pictures between now and moving day. Hardly ideal but we both want to make sure this blog gets finished properly, so we will do what we can. Expect a couple more posts after this one between now and moving in but don't be surprised if we fail miserably. We'll do our best!

As I mentioned, we went over on Sunday in the morning and the changes were apparent as soon as we arrived. We took a lot of pictures so probably the best way to explain the changes is for me to just put a selection of them below and caption each with an explanation. Here goes...

stone apron
Grey stones we have added to the apron of the house. To the left is the concrete on which the outside tiles will sit. To the right is the border with the lawn which will go around the other side of the house. 
stone apron
The same stones, viewed from the opposite angle. Walking down here is still a little dicey. Will feel much safer when the roof is over the car parking area. We really like the color contrast though.


stone apron
The other side of the house. View to the east. The concrete slab is the area for drying clothes. On the right will be flower beds. They are horribly overgrown at the moment. Not sure what the pile of wood under the blue tarp will be used for.

stone apron
Looking back the other way to the west. The trees next door are actually quite nice to look at. Again, the border at the end of the stones will be lawn.

stone apron
The east side of the house. Soon the be filled up with all sorts of air conditioning units and other equipment. Actually feels very spacious and easy to walk down. I remember when the scaffolding was up and we were really squeezing down here.

stone apron
Something else has been connected. Not sure what yet!

garden earth
The garden has been partly leveled. Landscaping starts today and the lawn, which will cover the whole area here, is the last thing that they will do.

slope garden japan
The temporary ladder that adorned the slope has finally been removed, ready for landscaping. Given how steep and dangerous this slope was to go up and down, we are really looking forward to being able to do so safely.

genkan porch tiles
Concrete has been laid ready for outside tiling. We went for quite a big area of tiles to fit the proportions of this part of the house.

genkan porch tiles
The tiles for the outside entrance. Piled up and left in boxes outside. It's nice to live in such a safe country. Can't imagine them lasting long in London!

name plate concrete black
Wiring for the name plate and intercom. After a lot of back and forth, we ended up sticking with the original grey intercom system though we did change the light and name plate to black. Should look good I think.

mystery connection
A new connection. Not sure what this is yet either!

genkan getabako shoes box
Shoes box in the genkan. The window gives loads of light without compromising privacy. Cupboard is pretty deep too so we should be able to put flowers and ornaments on top without too much trouble.

genkan coat closet
The coat closet in the genkan. This was the builders' idea and it's a really good one I think. It's always difficult to figure out where to store bulky outdoor coats and bags. I haven't seen this before in a Japanese house.

study white walls
The study, now with white walls! The room looks much bigger and is absolutely filled with light. This should be a very pleasant place to work. The walls are not completely finished yet but this room is getting pretty close.

walk in closet
Walk in closet. We are relatively tight (<1cm) on the RHS for the furniture we want to put in here so we have sent a message to the builders asking them to install very minimal skirting boards along the right hand wall. The PAX closets should look really good in here.

master bedroom
Master Bedroom. Love the wooden beam. Difficult to believe we were considering covering it with white at one point. Very glad that we didn't. In the corner is a box of new 6A network cable, which you may recall from last week's post. Loads of natural light in this room too.

master bedroom
The master bedroom from a different angle. I think we made the right choice to not have a door on the Walk in Closet. I think the two spaces flow together better. We will have curtains across the big doors to the deck outside.

storage cupboard
First look at the storage cupboard opposite the toilet. We had thought the vertical divide would only go up as far as the horizontal shelf height but floor to ceiling is much better in fact. This is a pretty big space, surprisingly so in fact. Will be home to skis and my ancient set of hand-me-down golf clubs.

laundry room
Laundry room. The white wall is the splashback for the washing machine (LHS) and the sink (RHS).

laundry room
Here you can see the shape of the counters we have had built into this room. The height is great. The LHS counter has the same depth as the cabinets above it, whereas the RHS counter comes up further than the cabinets and can be used for ironing, sewing and sorting clothes.

laundry room
The RHS counter. Depth is really good I think. We will put a stool underneath for sewing or lazy laundry.

bar counter breakfast
Breakfast Bar counter. It is surprising how well this seems to function as an actual bar counter. I can imagine enjoying a pint or a cocktail sitting here as well as a bacon sandwich (perhaps together?) The wood on top is wonderfully smooth and solid feeling. The vertical wooden poles are temporary and for support. 

bar counter breakfast
Viewed from the living room. You can see that the breakfast bar is quite wide. It should accommodate either 2 or 3 bar stools. We haven't ordered them yet as we want to check the height using our battered IKEA low stools as a guide.

bar counter breakfast
Breakfast bar in relation to the kitchen (RHS) and living room (LHS). Connected to the breakfast bar will be a 65cm island unit. The dining table will be on the side closest to the camera (Photo taken from next to the window that overlooks the garden)

washitsu japanese room
Japanese room. Now raised and enclosed. You can see the two holes at the bottom which will house the sliding drawers. It is a very satisfying step up from the living room. Feels very cosy, as a Japanese room should.

washitsu japanese room
Flooring for the Tokonoma part of the room. This will be wood as opposed to tatami straw mats. We had originally planned to put low shelving here but couldn't figure out what style and size so we opted to go without until we have lived in the house for a while.

washitsu japanese room
Ladder for the loft area above the Japanese room. I was surprised to learn that this too is made of wood and far more stylish than I had expected. I thought we would be getting a lightweight metal ladder but this is really nice!

staircase
Stairwell staircase now with white walls. The yellow thing is a foam protector, not some funky new handrail design.

staircase
Staircase up to the roof balcony. Looks great with white walls and blue sky. The roof balcony is still just a few steel struts. Construction on that is due to start in about a week and a half.

wooden sliding doors
Wooden doors delivered and ready to be installed. They are beautiful, very heavy sliding doors. The woodwork is exceptional.

That's a lot of photos! If you are still reading, I hope you enjoyed the latest installment. I will do my best to get the next update up as soon as I have the photos from Yuko, so in about a week's time. Thanks again for reading and talk to you in a few days!


Wednesday, 4 December 2019

Changing Colour

As promised, here's the second installation this week, focusing on changes to the house itself. Thanks to all those so far who have commented on Facebook and messaged us about the garden. So many great ideas! Hopefully we can address some of them and show the changes were are thinking about incorporating in the next update.

Having said goodbye to the man from the landscaping company, we were then free to explore the house. On the outside, about half the grey mortar had been covered over with the outside, coloured layer. Finally we could see what colour our house is going to be!

Well, not exactly. Unfortunately, the coloured mortar was not yet dry which means that what we were seeing was a shade darker than the final colour. We actually liked the darker shade quite a lot! I guess it's lucky in a way that we didn't have the option to "pause" there and take the darker colour - whether to do so or to stick with our original choice and go lighter and brighter would have been a difficult choice. Thankfully, that's all hypothetical due to the laws of chemistry and physics so we will have to cross our fingers and hope we like the light mortar as much (I'm sure we will!)

Inside, there were quite a few changes, the major ones I will describe briefly below before the usual photodump at the bottom.


mortar colour balcony

So here is the colour of the mortar as it was on Saturday afternoon. As mentioned above, it is going to get a fair bit lighter than this as it dries. This area was getting a reasonable amount of light though, so any shaded aspects of the house are likely to have a similar hue. I think it works quite well with the shine grey window frames.

ducting skirting

Here, one of the workmen is putting up the kind of "false wall skirting" which will go around the top of the room. This will be used for cabling and ventilation as well as the ducting which will cycle heat from the upstairs back downstairs using a fan system. This allows the house to re-use warm air in a cycle. 

The skirting extends about 60cm out from the wall, partly at about 195cm height (in the far RH corner) but mainly at about 230cm. It will just look like wall when it's finished. It's a shame to lose some of the sense of space in the upstairs area but, then again, we wouldn't have even thought about this if we weren't building the house from scratch. These major details just dissolve into a completed house. I guess we are lucky that we get to experience both the before and the after and it will be interesting to see how this changes the feel of the room.

pantry

Finally the other side of the doorway is framed up for the pantry. The doorway is not as narrow as feared and just the simple addition of this framed part makes it feel more like an enclosed space.

walk in closet sliding door

The walk in closet that separates the study and the master bedroom is finally being built. This will house the sliding door on the study side. It will be very different once these three spaces are finally separated. The study and master bedroom can be swapped around at a later stage if we want to (since the Walk In Closet has two entry points). In hindsight, this was actually a very clever idea! Well done us!

study almost completed

At last! A completed ceiling. This is what the study looks like. The sloped roof is very noticeable and may take some getting used to. I wonder if it will be as obvious when the room is full of stuff and fully functional. That said, I am currently sitting in a room I sit in every day and can't imagine what the ceiling looks like without looking up so maybe we won't notice it as much as we think.

upstairs toilet entry

Here's the new access they have built to the upstairs toilet. Previously the bit on the left was missing so it looked like all one big toilet space without the "corridor". I quite liked the "big toilet" but Yuko said it was weird to have a toilet door right at the top of the stairs, even a sliding one. The toilet corridor is growing on me. We can put a nice picture on the wall at the end.

Right, that's the major bits taken care of. Below are a few more captioned photos. We'll be at the house again this weekend so will take some more photos. Speak soon!

toilet upstairs
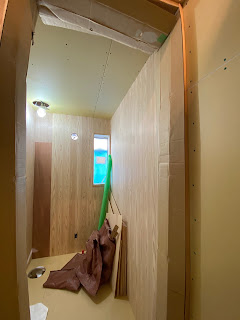
Inside the new, smaller upstairs toilet

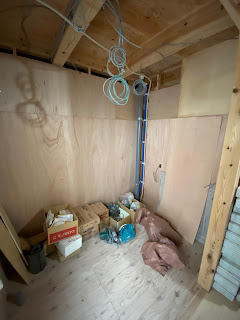
Walk in closet space (far end), large storage cupboard (near end)

Corridor kids bedroom
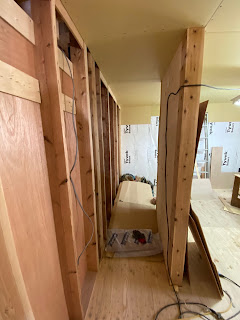
Corridor alongside kids bedroom (RHS)

Corridor kids bedroom study
As above but from study (soon to be closed off)

Corridor door
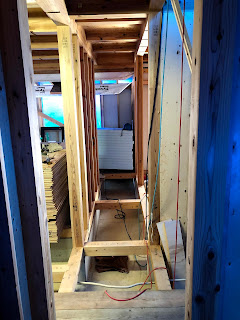
Other corridor towards back door

laundry room
Laundry room

脱衣所
Bathroom prep area (脱衣所)


Monday, 9 September 2019

Lots of Progress

September already! The summer has really flown by and it's been a couple of weeks since the last post. Yuko and I have been in Vietnam for the last week, drinking and eating far too much and having a great time. We got back on Saturday, both rather tired but excited about the next meeting with the builders on site, which was set for the following day. Thankfully the big typhoon that hit Tokyo yesterday avoided the Kansai area so everything was still intact when we arrived.

I have made a few references to the building schedule in this blog but our most recent update had the house being finished just in time for Christmas and my Mum's visit to Japan. We are desperately keen to have Christmas in the new house this year and be out of our tiny apartment once and for all. Unfortunately, the builders let us know recently that, due to a combination of factors, mostly unavoidable ones like weather, this was looking unlikely and they were nearly a month behind schedule. We pushed back on this, indicating that we were understanding but pressing them as far as we possibly could to try and get back on track. Though unable to make any concrete (please god, no more concrete) promises, they are evidently doing all they can.

With that in mind, it was really wonderful to see how much things have progressed in just two weeks. There are new additions all over the place, both upstairs and downstairs. It is really starting to feel more like a house and less like a building site. The exterior boarding for the walls is up and ready for the installation to be installed. The windows are onsite, ready to be fitted. The downstairs plumbing is all in and ready for the bathroom and toilet installation. I'm not sure if this was to be expected or is a responsive increase in pace but we are grateful nonetheless.

Having the boarding on the walls up gives a much clearer idea of the layout of the house and the size of the rooms. One does have to be a little cautious however, as having just boarding to demarcate rooms ignores the fact that real walls are thick and insulated and will the open spaces will reduce in size when walls are completed. The same is true for floors and ceilings which will come up and down respectively when layers and finishes are added.

We also had a couple of decisions to make on Sunday, one of which was the colour of the mortar to coat the exterior of the house. Yuko and I realised about 12 hours before the meeting that we hadn't really discussed this properly and it was already too dark to walk around near our apartment for some inspiration. Oops. 

Though we had previously made a preliminary indication of preference, we couldn't really remember what it was and weren't exactly sure what sort of a choice we were going to be presented with at the meeting either. When the meeting rolled around, we were shown three 30x30cm boards, each with different shades of greyish, yellowish mortar and asked which one we liked the best. 

The good news was that we liked the same one. However, I felt that it needed to be a bit more yellow-hued. This was hard to explain so I used words like 'sunny' and 'warm' which didn't really help. Then I had a brainwave. I excitedly referenced another house that our builders had built in the area that, from memory, was exactly what I had in mind. When we checked on our phones, it transpired that this house was in fact bright yellow and not covered in mortar at all. Another shining example of how a less-than-stellar memory and unbridled confidence gets you nowhere. Bemused, they agreed to knock up a slightly more yellow mortar sample for us. To be continued I guess.. 

The other decision was what to do with the shelving in the Japanese room. It was originally planned to be the same height as the low window (about 55cm) but we had changed the room design to feature a tokonoma (See here) in the corner and the architects felt that the shelving as originally planned might no longer fit and that a lower shelf might be appropriate. We couldn't really decide what to do so opted to remove the shelving completely and figure it out once we have moved in - flexibility and a cost reduction in one fell swoop! Marvellous.

That was about it for the meeting. It was hot so the builders supplied cold drinks and offered apologies for the construction delay, stating that (again, no promises) they were doing everything they could to catch up. We were grateful for this and I suppose should count ourselves lucky that 18 months since starting this project, we still have a really strong working relationship with them. We still look forward to meetings, discussing progress and changes with them. The house they are building is shaping up so, so nicely. Only a few more months to wait!

And finally, what I'm sure you all came here for - some pictures!


master bedroom hallway wood
Hallway leading to kids bedroom (LHS) and master bedroom (RHS)


flooring wood insulation
Piles of wood (I believe for under the flooring) and insulation

laundry room wood windows
Laundry room (viewed through what will be the downstairs toilet). Window and back door ready to go in

Master bedroom with large French doors opening, frame for which is on RHS

sheeting hallway wood
Outside wall sheeting is now all in, ready for insulation

black windows lixil study
The infamous pair of black windows


study french doors windows
View through the French doors of the study
north south corridor wood house
The north-south corridor running the length of the house


bathroom window lixil
The bathroom. Plumbed, and ready to be installed. Love the long window!

laundry room plumbing
Laundry room plumbing. Red for hot and Blue for cold. Will house a small window. Back door is on the LHS in the corridor

japan house building insulation
Piles and piles of insulation. Ours is made by Styro Ace.

moisture barrier japan house
Moisture barrier boarding on the outside of the house.

kitchen bar japan house
The SW corner of the building. Will house the wine cellar (like a big fridge)

washitsu japanese room construction
The Japanese room. Not sure why there is still a big hole in the wall on the LHS. There's going to be a window towards the top but it's not that big!

north wall house
North wall of the house upstairs. Wood burner will go on LHS in the corner. TV somewhere in the middle. Balcony is on the far LHS (still covered in blue sheet)

staircase ladder
What will be the staircase. Ladder is now considerably more stable!

toilet bathroom upstairs
Upstairs toilet

kitchen pantry doorway
View along the kitchen through to the pantry. Pantry doorway will be narrower when the LHS is added.


竣工 - The End :-)

Greetings from our new home! It seems crazy to be saying that but we have finally moved out of our small apartment and are now officially (p...