Thursday, 25 October 2018

House Walkthrough 1 - The Genkan


Perhaps one of the most important features of a Japanese house is the genkan. It’s the first thing you walk into when you go through the front door and, thus, seems a convenient place for me to start on this room-by-room run through of our house plan. It’s also the only area in a Japanese house in which shoes are worn. Shoes are always taken off in Japanese houses and the genkan is the area for doing so.

Before we get to the genkan, I ought to talk about the porch. We have elected to build a 1.8m x 1.8m porch area as we felt that a covered outside space by the front door could be very useful. There was a lot of discussion about whether or not to put the mailbox in this porch area or down the steps at street level. Putting it in the porch would mean that there would be no issues collecting the post in the rain but that the postman would have to come up the stairs every day. We generously decided to give the postman the chance to do some extra exercise

The genkan is going to be quite large at 3.2m long by 1.8m wide. One question that we have been back and forth on is whether to have mortar or tile for the shoes taking off area. Tile is more expensive (but not by that much) and much less likely to crack apparently. We decided, given the relatively small additional cost and, more importantly, that this is the first thing we will see upon coming home, that it was worth the extra expense.

On the left wall as you come in, there will be a long shoes box. This is likely far too big for our shoes collection but these shoes boxes often get used for other types of storage and it will look good covering the whole length of the room and there should be plenty of space on top for photo frames or flowers. The builder is going to build this box for us since my shoes at US13/UK12/JP30 are too big for almost all store-bought options! At the end of the genkan on the left will be a cupboard for winter coats, already scaled to fit the largest coat we own between us. There will be one window on the left wall.
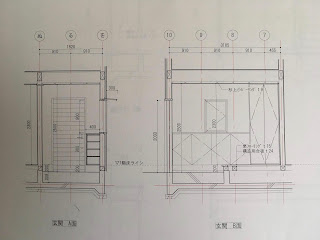

japan genkan plans
LHS is view looking back at the front door. RHS shows shoebox, coat cabinet and window.

On the right, we’ve opted for a sliding door into the hallway. Sliding doors are a little more expensive than regular doors but can generate almost a square meter of additional space. As such, we consider them to be a pretty good value proposition and have used them where we can throughout the house.

japan genkan plans
LHS shows view as you come in through the front door RHS show sliding door with entrance to hallway.

A final word on doors – for some reason, front doors in Japan are really expensive! The standard looking one that is in our current quote is around 200,000JPY (about 1800USD/1400GBP) and that is at a considerable discount to the online price. One reason might be that the lock systems are complex and designed to be very secure. This seems somewhat superfluous given that there have been just 3 crimes reported in the last 5 years in our area. Rather amusingly, all three were committed by a flasher a few years ago. Luckily the house is some way from his favourite reveal-spot.

That’s about it for the genkan. I’ll post about the next room in a few days.
  

Monday, 22 October 2018

Filling the Void


In the last few weeks we’ve been through various revisions of the plans for our house with the builders and, in truth, there haven’t been many big, exciting changes. As much as I could write a blog post about moving plug sockets and marginal changes to window sizes, I’m not sure that it would make for especially compelling reading.

As such, I was thinking about what to do to fill the void between the detailed but boring planning stages and the start of construction, which should hopefully be only a month or two away now. I don’t want to stop the updates as there has been a lot of positive feedback from readers (we’re at around 5000 page views to date) but also because writing this blog is quite cathartic and has on more than one occasion helped us with actual decision making. Assuming I can keep it up, it will be a nice written and visual record of this process. Perhaps I shall turn it into a shiny coffee-table book when we’re done.

What I’ve decided to do is to write a short piece about each room or feature of the house, each with slightly more detailed plans. That way, we can cover the house in more detail but in more manageable bites. I’ll endeavor to get a post out each week.

Monday, 8 October 2018

Solutions, not problems


As you may be aware, in Osaka there was a pretty big earthquake recently, reaching a magnitude of 6.1 on the JMA scale. We were at home at the time in our apartment, a newish block which is presumably fairly well protected against such things. Since we’re on the 5th floor, there was quite a lot of swaying and the earthquake itself was very violent. We both dived under the small table in the living room, me banging my head in the process.

The earthquake on June 18th

Luckily we both escaped from the quake unscathed but the 4 dead and 400+ injured were not so lucky. One of the fatalities was a 6-year old schoolgirl who was killed by a wall which crumbled outside her elementary school. Tragic.

As often happens following these events, building codes and policies are reviewed and renewed and we discovered that this would also affect our house. As you may have seen from the pictures and plans in previous posts, we had planned to partially remove the East end of the stepped retaining wall and to build a parking area in its place. This would have allowed us to keep the large stone steps to the West end of the wall, which we really liked. Furthermore, since groundwork in Japan is very expensive, we had been advised to make as few changes as possible to the wall.

Alas, the city office decided to reverse their acceptance of the original proposal and we had a lengthy message from the builders which said, in essence. “There’s a problem with the wall. You don’t have a lot of options. We’ll probably have to remove the whole thing. We need to talk”. It sounded rather ominous indeed.

The large, imposing two-stage retaining stone wall (二段擁壁) was always something we liked but we knew it was likely to cause us some building difficulties and we had somewhat accounted for this. In the second plans which radically reformed the parking area, we had more than used up this contingency. Further changes were far from ideal.

We began Googling to get a rough idea on how much this was likely to cost us which was absolutely terrifying. The first page we looked at said “don’t buy land with a two-stage retaining wall”. Oops. The next quoted between $20,000 and $100,000(!) depending on the nature of the problem. Our wall is big too. More-than-oops. What had we let ourselves in for?

We spent the few days before the meeting going through various scenarios and solutions, some more ridiculous than others (pickaxes at midnight etc.) and resigned ourselves to the fact that we would just have to wait for the meeting. We felt stupid for not having done enough research (can you ever do enough?) and were both really nervous for several days. It was extremely unpleasant.

Finally, the day of the meeting came around and we met with the builders in a coffee shop in central Osaka. We sat down at the table and prepared for the worst. Now at this point, I should mention that we considered anything less than $25,000 a “positive” outcome, up to $50,000 was terrible but wouldn’t necessarily kill the project. More than $50,000 was probably game over. Sell the land at a loss and start again or, more than likely, give up.

The building company were great. They didn’t present us with a problem, they presented us with a solution. (In fact, 2 solutions, the other more elaborate and vastly more expensive which they advised against.) In the time between discovering the problem and meeting us, they had consulted the city office, fought our case, consulted an expert, engineered and priced a solution and then produced a plan of it all.

There was a quick explanation of the problem and then immediately the revised paper plan was brought out. Everything had already been accounted for. Remove the second and third steps of the wall and replace with a slope on which we can plant flowers, grass etc. How much? Less than $10,000.

In your face, scary Google! It’s weird being happy about such a huge unexpected expense but everything we had read suggested this was going to be so much worse. There is such an investment of time and emotion and energy and resources into these projects that to have to confront the fear of potentially giving up is really harrowing. It reminded us that there’s so much we don’t know and we just have to hope that, through a mix of luck and, hopefully, the experience of our builder, we will get there in the end. Until next time. 

japan parking plans
Our new slope


竣工 - The End :-)

Greetings from our new home! It seems crazy to be saying that but we have finally moved out of our small apartment and are now officially (p...