Back in the spring
of this year, we went to see a house that our builders had recently completed
and were pleased to find that the owners had reversed the usual layout, putting
the main living area upstairs and the bedrooms on the ground floor. Although
this is quite rare in Japan, it was something that we had been considering.
People had told us that doing so is very expensive but we were relieved to hear
that this was not in fact the case, especially if the bathroom (which can
require structural reinforcement underneath) remains on the ground floor.
The additional
light and feeling of spaciousness from having the house configured this way was
enough to convince us to go ahead with this plan ourselves. As such, we are
having an open-plan living room and kitchen on the upper floor. It will feature
a sofa and TV area, an island kitchen with connected dining table, a corner
“bar and wine-cellar” space and, finally an enclosed pantry room next to the
kitchen. There will also be a toilet near the top of the staircase.
 |
| The upstairs living and dining area. North is to the top of the paper. |
I’ll start with
the sofa and TV area. This sits at the north end of the space, adjacent to the
Japanese room (the next blog entry) and the balcony (the blog entry after
that). In the corner will be a (British!) wood burning stove capable of heating
the whole of the upstairs area and, due to some very clever air recycling, some
of the downstairs too, all being well. Wood stoves are not usually the most
cost effective way of heating houses but, in this case, we have been rather
lucky (or clever, depending on how you see it).
By going with a
building company based a minute down the road from us, we have access to free
wood for burning whenever we require it, as long as we are prepared to cut it
and transport it ourselves. This is a mutually beneficial perk in that they can
keep us happy and supplied with winter fuel and we can help to relieve them of
the offcuts from their building projects that they would otherwise have disposed
of. Symbiosis in all its finery. The one problem is that our tentative move-in
date is in the middle of the hot summer next year so it’s unlikely we’ll get a
chance to test out the new stove for a few months!
The TV will be
placed against the North wall with a long horizontal window above it. We will
be bringing our cheapo TV board from the current apartment as we’ve grown
rather fond of it and it’s pretty inoffensive to look at. We’ll probably have
an L-shaped sofa and coffee table with perhaps an additional armchair added at
some stage. It’s odd that, despite thinking about the house almost constantly,
it’s still really hard for me to visualize the size of this space. Time to get
the tape measure out again.
To the south,
we have a large island counter unit with raised breakfast bar which should
accommodate a couple of stools. We have been back and forth so many times about
what to put on the island. Essentially there are three choices. 1) a sink 2)
the hob 3) nothing. The downside of the sink is that it means you have to look
at either dirty items waiting to be washed up or clean items that are drying.
The hob looks nice and you can talk to people while you are cooking but it
makes extractor fans more difficult (or much more expensive in the case of
downdraft extractors). Cooking oil has a habit of getting everywhere too.
We have
therefore opted for nothing on the island. This is a little boring but should
enable us to make great pizzas and dump all the shopping down when we get home.
If we really want to cook on the island we can use a cheap portable gas stove,
which we already own. Also on the island will be a western-sized oven (which is
being delivered today!) and a few cabinets. Connected to it will be a dining
table (likely our current, horribly stained, bottom-of-the-IKEA-range version
for the time-being) and 4 chairs.
On the south
wall will be a long counter with sink and hob and various cabinets and a drying
rack. I believe this is called a Swedish something-or-other. Although we will
not install a dishwasher immediately (the quote from the fitter the builder
uses was really high), they will prepare the cabling and piping for us to add
one at a later stage. I anticipate we’d be able to save a few hundred dollars
doing it this way but we’re not entirely sure if we will get one at all. The
countertop (both the wall unit and the island) are going to be granite. We have
found a supplier that is not too expensive and we both think it will make the
kitchen really special. It’s such an important part of he house to us that
we’ve decided this is an area to spend a bit more on.
Adjacent to our
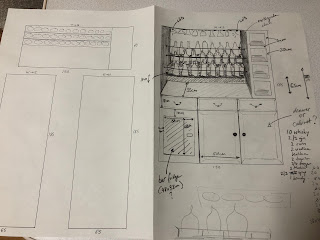
fridge in the south-west corner will be the bar and the wine fridge. When the
plans were almost finalized and our existing appliances accounted for, I was
left with just over 2 meters of space in which to accommodate both items. Since
the wine fridge we have chosen is about 60cm wide, this left about 150cm for
the bar – not too shabby! This is the only part of the house I can truly say I
have designed myself. I took a pencil and some paper and drew up a scale-ish
drawing of the bar and gave it to the architect. He seemed quite impressed!
 |
| The bar. Original plan was three 'steps' but final design will likely have 3 rows of bottles above each other. |
The bar will
have 3 rows of bottles, each one a bottle deep and holding 12-15 depending on
dimension. The top row is intended to be Japanese whisky, the middle Scotch and
the bottom for others. There will be brass runners running horizontally to stop
bottles falling during earthquakes and angled earthquake-proof rails above for
us to hang glasses. On the right-hand side will be doored cabinet with more
space for glassware and accessories. The counter-top below the bottles will
provide space for preparing drinks and underneath will be drawers for (more)
bottles, cutlery and a fridge. It’s one of the parts of the house I am most
excited about since I’ve never really designed anything before and it will be
really cool to see the idea actually comes to life.
To the East of
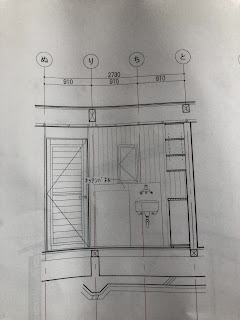
the kitchen is a pantry room for storing our dry foods and a few appliances. We
were both quite keen on having a lot of storage space for food as we do a lot
of our shopping at Costco. For those of you unfamiliar with Costco, it’s an
American wholesaler which sells really good products (but in bulk) and is a
great source of ingredients and items that can otherwise be really expensive
here in Japan. The pantry will have a window for overall ventilation and simple
shelves on both sides.
Just outside
the pantry is a shokkidana which is a
kind of Japanese welsh dresser and is used for holding all sorts of plates and
mugs and other items. My wife has designed it (after some not inconsiderable
consultation with her mother) to feature plenty of storage, a space for the
rice cooker and a place to display our copper pans. We looked at a few
store-bought options but the quotation from our builders to make one for us was
pretty reasonable and so we went with Yuko’s design. A happy wife is a happy
life right?


