Monday, 28 January 2019

Oops. The wall fell down!

We've been to the land a few times recently to check on progress and things are moving on at a pretty fast pace. Unfortunately, it's a bit tricky to get there with work schedules being what they are and the fact that it takes around an hour on public transport from our current apartment. We are looking at buying a car in the next couple of months, assuming we can find some local parking, as this will help us to go to site more often and to the various showrooms and furniture shops that invariably are situated in the middle of nowhere.

The most recent trip was at the request of the builders. We have a shared private Facebook group through which we can communicate, share documents and photos and keep a log of progress. It's a really effective (and surprisingly modern for Japan) approach to doing things and has been working really well. We received a message on the group to ask if we could come to site as there were a couple of things to discuss.

Invariably, this leads to a certain element of worry and uncertainty as past experience has shown us that "things to discuss" have a tendency to be "things which will cost more money" and so again we left for the meeting with some trepidation about what exactly we were in for. I'm sure the builders don't mean to make us worry and it's difficult to adequately explain what's happened on an internet forum but I do wish there was some way that we could alleviate the fear of not knowing a bit!

Anyway, we got to the meeting to discover that in removing the steps on the eastern edge of the plot, the wall separating our plot from next door had collapsed! It transpires that the ground in that area of the plot is somewhat less solid than had been predicted and this caused the wall to give way. Thankfully, our neighbours have been very understanding and the builders have done a very good job of smoothly over any potential tensions, quickly offering a solution which was deemed cosmetically and practically acceptable.

The downside is that we will need to install six or seven additional steel pilings and, if I understood correctly, a kind of metal retaining barrier to shore up the ground before installing the new steps and the concrete walls for the parking space. Obviously this is likely to be a reasonably hefty expense and, since it's not a mistake but rather a discovered feature of our quirky plot of land, it's on us to foot the bill. Marvelous.

I think in these situations, it's always healthy to try and mitigate with a bit of positivity as far as one possibly can. In this instance, one such comfort is that we did get the land for a steal on account of it being rather difficult, and thus we do have a contingency for dealing with such problems (and indeed we expected a few). The other is that we at least know now that the land will be safe and stable and will have documentation to that effect. Aside from giving peace of mind, it's likely to be appealing to a buyer should we ever decide to sell and move on in the future.

The work is likely to delay progress by a couple of weeks which is unfortunate but not the end of the world. There was also some promising news this week that the government has extended the eco-subsidy that we have applied for from February to August and so there is a chance that, if the builders work quickly, we'll have a chance of having our application accepted. It's worth 800,000 yen so we're really hopeful of a positive outcome!

Here's some pictures of current progress:
house building ground preparation
Looking south. On the LHS, you can see where the wall fell down!


house building ground preparation
A view across the car parking space to the south west

house building ground preparation
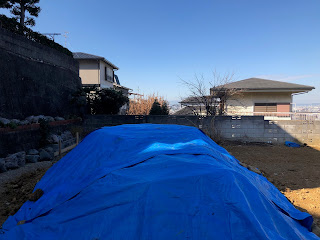
The new slope where the old stepped wall was situated. Slope will be the part under the tarp. Gradient will be a little shallower than this and will feature flowers and trees (probably)

house building ground preparation
Looking down from the top of the plots at the parking space. The pole on the tarp is actually about where the north wall of the house will be.

house building ground preparation
View across the plot to the north west. As you can see, a lot more digging has been done in the last two weeks!

house building ground preparation
Large mound of earth under a tarp on top of the plot. Not sure what will happen to it.


Friday, 25 January 2019

Digging Begins!

After months and months of waiting, the digger has arrived and we have finally broken ground. It’s taken such a long time to get to this stage that we were really starting to wonder whether it would ever actually happen. Nevertheless, we have started!

The builders started by introducing themselves to those in the vicinity of the plot and explained that they were planning to commence construction and the likely duration of it. Usually we would have accompanied them but we were away in the UK at the time. There were no indications of any objections, I think partly because the plot has been empty for a while and a new house is decidedly less unsightly than some straggly plants, weeds and tall grass. I did ask the builders what happens in the event that someone objects and they said “We build anyway. It’s your right”. So much for asking for permission.

Often in Japan there is also something called a jichinsai, which is a ceremony to purify the land before construction starts. It wasn’t something we especially wanted to do as it is quite expensive and doesn’t mean anything to us (but we were prepared to do so if family were interested and we did think it might be quite an interesting cultural event). As it turned out, there wasn’t time to have the ceremony before we went to the UK so we managed to swerve it in the end. Of course, it being Japan, there other ceremonies further down the line. Whether we’ll be able to avoid them too, only time will tell.

At any rate, the first work started and has basically involved cutting into the tall stone wall to make way for the new double parking space. As you will see in the pictures below, there is not much else to report other than to marvel at the fact that apparently one guy managed to make that huge hole with a tiny digger in just one day! I can’t really think of anything else to add for now so enjoy the photos!   

house building ground preparation
The little digger

house building ground preparation
Bye bye tiny parking space!

house building ground preparation
The hole with view to the West


Friday, 18 January 2019

House Walkthrough 9 - Deck, Balcony and Roof Terrace

This is the final chapter in the walkthrough of the house. There are a few other small things that will no doubt appear in future posts but I think we’ve covered the main elements throughout this series. I hope it has been interesting to read about!

For this entry, I’m collating together what I might call the “connected” outside spaces. What I mean by that is the balcony, wood deck and roof terrace. Although we will have a garden at some stage, we currently have no idea what it is going to look like or whether there will be enough funds left in the budget to complete it soon after finishing the house itself. It’s likely something that we will have to come back to months (years?) after finishing the building. I’ll be sure to write a blog about it at some point!

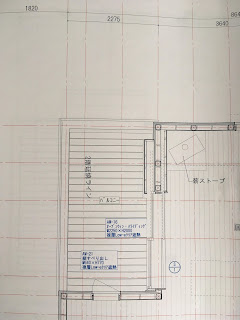
As for the wood deck, it is a kind of L-shape surrounding the master bedroom and the study, wrapping around the North West corner of the house. It will be about 1.5 meters deep which should allow for a couple of outside chairs and a small table. In one of the meetings we talked about putting some hooks up for a hammock underneath the sloped roof. I’m not sure if that is still on the cards, though to be honest, if I can’t start shifting some of this Christmas excess, I’d end up pulling the whole house down if I tried to get into a hammock.
japanese house plans deck
The wood deck
I’m not sure yet exactly what function this deck is going to perform but we both really liked it in the model house that we saw. Being able to transition between rooms via a covered outside walkway is kind of cool and it’s nice to be able to sit outside looking at the garden with a cup of coffee. We also like the idea of a gentle transition between the indoors and outdoors which is found in some traditional Japanese homes. I remember walking on such a deck in one of the old houses in Kyoto and enjoying the feeling of wood on shoeless feet whilst looking at the garden. Hopefully we can recreate something similar.

Upstairs, there is a large balcony (4mx2.3m) connected to the living room by a really cool custom-made sliding door. Again, we saw this in the model house and it really adds to the light and space, making the living room itself feel much bigger. Since the doors open to be completely hidden in the wall, again there is this neat connection between inside and outside.

japanese house plans balcony
The balcony
The most important thing for this balcony is that it can be used for something practical. Most Japanese balconies are small and used only for drying washing. However, at around 10m2 ours is big enough for a table and chairs so we will probably endeavor to have dinner out here when the weather is nice (and the mosquitos are on holiday). Its proximity to the kitchen should make this very practical. To the North West we will have mountain views over the road and we may even be able to see Osaka over the house to the West.

May be able to see Osaka? What do you mean may? Surely you know for certain and have planned this intricately?! Actually, no. The reason we haven’t put huge amounts of thoughts into the geometry of the views from this balcony (other than situating it in the best possible position for the view to the North West) is that our house has a really interesting and rather unique feature - a roof terrace!

The roof terrace sits about 7 meters above the foundations and is accessed via a continuation of the stairwell from the living room, almost like an additional floor. Like the balcony, it measures about 10m2 and will give 180 degree views of the surrounding landscape. This was really important to us as one of the most impressive things about where we have decided to live is its location, on the side of a mountain. From the roof terrace, we will be able to look out over the house in front to see the vast expanse of Osaka city to the West and the mountains to the north. On a clear day, it is possible to Kobe 50km to the west.
japanese house plans roof terrace
The roof terrace from above

japanese house plans roof terrace
Where the roof terrace sits

The intention is to have some comfortable seating and a small table or two up there so that we can enjoy watching the sunsets with a drink and some snacks. Since the weather in Japan almost always comes from West to East, another advantage is that we should be able to get a live weather forecast at any time just by heading up there and looking into the distance!

Most importantly, the roof terrace gives us security for the future. As I mentioned, one of the best things about where we have chosen to live is the view and this roof terrace protects that. The house to the west is old (and seemingly unoccupied) so we have no idea how long we have until someone decides to knock it down and build something new. Though there are protections about sunlight and proximity, there are no protections for a view so it’s possible that a new full-height building could block some of our view on the upstairs floor. It is true that the foundations of that house are a few meters lower than ours so they cannot build a house as tall as ours but having a roof terrace mitigated a good deal more of that risk and so we decided to go ahead with it. We cannot wait to stand up there for the first time and take in the view!

That about wraps up this series. From now on, we’ll mostly be featuring photos and updates on the development (which as I mentioned last time has now started) as well as any other interesting stuff that comes up. For those that have been following so far, thank you so much for doing so. We’re looking forward to sharing the next stage with you and showing you some real-life progress. Stay tuned!

japanese house plans
Our lovely house!


Sunday, 13 January 2019

House Walkthrough 8 - The Japanese Room


In the North East corner of the upstairs space we will have a 和室 (washitsu) or Japanese room, the floor of which will be made of traditional Japanese reed mats called 畳 (tatami). These rooms are typically used for celebratory meals or as an additional sleeping space for guests. Houses that have a family shrine often place it in this room, although I don’t think we will be getting one ourselves.

japanese house plans tatami
Location of the room in the top north east corner of the house
We want to keep this room as simple as possible so have opted not to include much in the way of shelving, save for a low lying runner unit on the north wall. Along the east wall will be some low (frosted?) windows bringing in some natural light.

japanese house plans washitsu
Low windows at the bottom of the east wall
We have had to make two relatively big decisions with this room and both were quite difficult. Firstly, we were asked whether we wanted the floor to be flush with the living room without a step up onto the tatami. This was our first preference. However, what we discovered was that by raising the floor of the Japanese room, we could install long drawers which slide out, into which we could put all the futons and bedding for when the room is used for sleeping. We decided that not having to include large cupboards for this stuff would give us a larger and simpler space and so we decided that the trade-off was definitely worth it.

The second decision was whether or not to leave the space open or to put in some sliding doors to separate the space from the living room. This time, it was a financial consideration as these doors were not exactly going to be cheap. That said, if we were to decide to have doors, there were various options to choose from, falling into two main categories.

The first are called shoji which you may have seen in pictures or films. They are basically a light wood frame and the “door panel” is made of waxy paper. They are beautiful but bad at keeping out unwanted light, poor at keeping heat in and prone to getting broken by kids and drunk adults. They are also quite expensive. The second are called fusuma and are heavier and more hard-wearing and better at keeping light out as they are more opaque. They are also a little cheaper but, I think, less beautiful than shoji. (More info about them both here https://simplicable.com/new/fusuma-vs-shoji)

japanese house plans washitsu
Doors separating the space from the living room
Again, we flip-flopped between the two different kinds of doors and also having no separation at all. Eventually we concluded that being able to close off the space was valuable but not to the extent that we would splash out of the shoji. We have therefore compromised and chosen fusuma. If the budget starts to get away from us, we can always change our minds again.

That’s it for this entry. The final entry of the walkthrough will be the balcony and roof terrace. Stay tuned!   

竣工 - The End :-)

Greetings from our new home! It seems crazy to be saying that but we have finally moved out of our small apartment and are now officially (p...